Recently, a reader named Paul left a comment on one of my posts saying that he also wanted to make custom cards that never were, and was primarily focusing on players from 1990-1994 who never had cards, and asked if I had any templates available. That got me thinking, and I decided to make a post with a few basic templates and tips on how to make a custom card. Even though this blog is called "TOPPS cards that never were", I decided to make some templates with the 1991 Donruss and 1992 Upper Deck designs, just because those are really the only card designs that had fronts and backs that didn't have different colors for every team in the league.
I typically use Microsoft Paint while making my customs, but I also have GIMP, which is a great photo program similar to Photoshop (I just haven't toyed with GIMP much), and if you have Photoshop, I'm sure you can make some amazing customs with it. I'm going to go through how to make a custom in Paint, just becuase most computers have it, and you can get similar programs on a Mac.
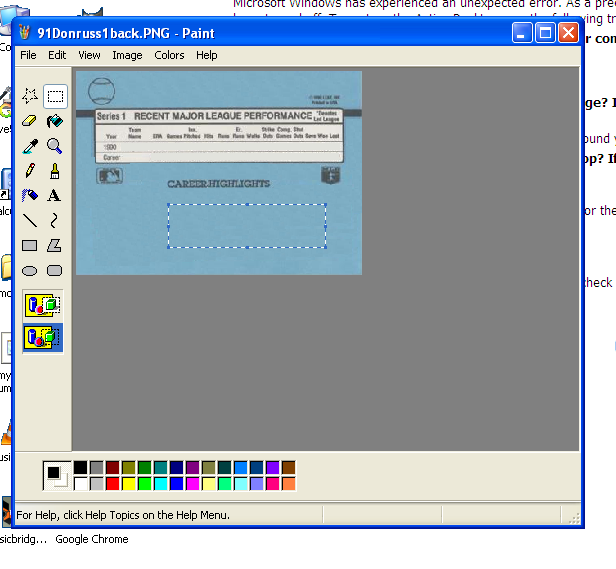
In Paint, the tool I use the most, is the Select tool, which is the tool on the top row on the right. You can use it to select a part of a drawing, and cut it, move it, copy or paste it. I usually use multiple windows of Paint at the same time, which allows me to copy and paste things easier. I would go ahead and open 2 windows of Paint. In the first one, open your template (let's go with the 1991 Donruss Series 1). You can just right click the templates I made and save them as whatever is easy for you to remember.
Now you need to pick which player you are going to use. I am going to do Jeff Bagwell for this one. Once you decide that, you need a photo. I usually find photos by googling a player+ a year that I need or a team that I need, and usually that works. For some cards, I have to find a picture from a Major or Minor League card.
www.comc.com works well for that, as well as
www.tradingcarddb.com. I would try to find a photo that is around the same size as the card that you are working with (bigger ones or smaller ones look all grainy and crappy when you resize them), and one that you don't have to do much touch-up work to (erasing a watermark, blurring out an autograph, etc.). Once you have found a picture, open that up in your other window of Paint. Select the entire picture, and copy it.
On the bottom of your tool window, it will have the top box highlighted blue. This means anything you paste will completely cover something you put it over. Highlight the box under it. This will make everything except the background (anything white) cover something you put it over.
On the '91 Donruss template, make the window big enough to fit another '91 Donruss card, the original one, and the new picture. Paste the picture in the white area to the right of the card, and select the card and copy it. Paste the 2nd card under the original card.
Then take the picture, copy it, and place it over the first card so it covers the area where you want it to be. You may have to re-size it a little, but that's fine.
Then copy the 2nd card (the one underneath the original, and now all you have to do is place it over the picture, center it, and you should have a custom card (you may want to zoom in when doing so). Go ahead and re-size the edges so it matches up with the edges of the card (using the blue squares in the corners and middles of the Paint screen).
If you want to put a logo on the card (like Rated Rookie, or the '91 Donruss logo), just open up the logo template, select the logo you want, copy, and paste it on the card where you want (with the bottom box highlighted blue, of course).
As far as team logos,
www.sportslogos.net offers a variety of team/league logos.

For the name, on a card like a '91 Donruss where it slants, you can do 1 of 2 things. If you know how to work GIMP or Photoshop, I believe it is relatively simple to do it on there, so just open the card on that program and make the changes. Or you can write each individual letter, and place it where you want it on the card, using the "ABC" tool (again with the bottom box highlighted blue). This will make it a little staggered, but sometimes, if you don't have any other choice, that's what you have to do, and that's what I did for this one. Also, to get everything lined up like it did, I selected each letter, moved it, and repeated until they all were done. Then I used the select color tool (the one that looks like a dropper), selected the red color on the stripe with the name, and then painted red on any parts of the stripe that were white after I moved the letters. Then I did the same thing with the blue (moved the letters on the position into place, used the select color tool, selected the blue stripe color, and re-painted any white). I used Arial for the font, sized 10, and made it bold for the name, and Arial font, size 7, not bold for the position. (in the font box at the top of the Paint screen, you can change the font type, size, and stuff. If you highlight the size of the font, you can type in what size you need if you don't see it listed.
Now that the front is done, save the front. If you want to make a back, it's relatively simple. Just open the file for the Series 1 back, type the player name/bio, enter the stats, enter some career highlights, and give it a number.
For Bagwell, since he didn't play in MLB in 1990, he would only get 1 line for stats. All you need to do to fix this is select the area below the stat box, keep going till you hit just above the 1990 stat line. Right click and copy that. Then, right click and paste, and cover the 1986-1989 stat lines with the section of the card you just copied (You may want to zoom in when doing so. Then, copy a section of the blue and paste that over any extra text you created when pasting the 1990 stat line, and try to get the colors matched up as best you can (by selecting blue sections in different places and by selecting smaller sections).
When doing the stats, sometimes it's easier to do 1 column for each stat, instead of doing 1 for the whole thing. I usually get my stats from
www.baseball-reference.com, and I'll get any bio or highlights from the back of another card, or Wikipedia.
I made a back template for Series 1 & 2. Series 1 has pitching headers, and 2 has hitting headers. Since Bagwell is a hitter, all you have to do to change it is open the Series 2 back template, copy the hitter header, and paste it over the Series 1 back, and do color correction if needed. For the stats on Bagwell, he just gets a simple NO MAJOR LEAGUE RECORD on his stat lines. Simple enough.
Some people choose to number their customs starting at 1. I choose to number mine like they are the next card in the set, so if I did a 1991 Donruss card, it would be card #771.
Baseball Card Pedia is a great place to find out how many cards are in a certain set, what size the cards are, and if any numbers are missing in the set.
One last note, I probably should've used the select color tool and selected the shade of black that Donruss used on "CAREER HIGHLIGHTS", because I used black from the pallate tray on the bottom of Paint, and it looks a lot darker than the shade Donruss used. I'm not going to fix it, but I think it would look a lot better in the original black shade Donruss used.
I hope this post helps any aspiring custom card makers. I also put templates for 1992 Upper Deck up, which is probably an easier custom to make than a 1991 Donruss. On the backs of '92 Upper Deck, the National League gets the green nameplate, and the AL gets the red ones, and you can also put another picture on the back, just do it the same way as the front. You can rotate the back by selecting IMAGE from the toolbar, FLIP/ROTATE, and then rotate it by angle to type in the stats and NAME/TEAM/POSITION sideways, and then rotate it back to normal. Feel free to post any comments, questions, and links to any customs you have made, and as always thanks for checking out my blog.
-Jeremy


I'm glad I could be an inspiration, and look forward to trying this out.
ReplyDeleteThanks for publishing this. It's a great help! But one thing I'm wondering is how did you create the original template in the first place? Do you scan an actual card and then edit in paint? Thanks for any help or advice you can give!
ReplyDeleteRon
Good question Ron. I went to www.comc.com and saved photos of the cards. Sometimes getting cards from there is tough because they have watermarks that are in the way of something, sometimes they are easy to work around. After getting the pictures of the original cards I edited them in paint by taking the polygon tool and choosing white as the color and the bottom choice (where it cuts out the whole area you select) and then just cut out the area where the picture was and copied and pasted the area where the names and positions were. After that I had a suitable custom template. Some sets like 90 Donruss or 91 fleer are easier to work with because you can just put a copy of a photo over the template of the card instead of having to get the photo in the right spot and put the card template over it. Hope this helps and if you have any other questions please let me know.
ReplyDeletehas anyone ever done a video do demo this process
ReplyDeletei dont think this process works any longer in 2025. Anyone have an update or a video?
ReplyDelete